Hampton Bay Ceiling Fan Capacitor Replacement Guide
Is your Hampton Bay ceiling fan running slowly, or not moving, or causing a humming noise, it may need a capacitor replacement. This article will guide you on the steps of replacing the Hampton Bay ceiling fan capacitor with ease and safety.
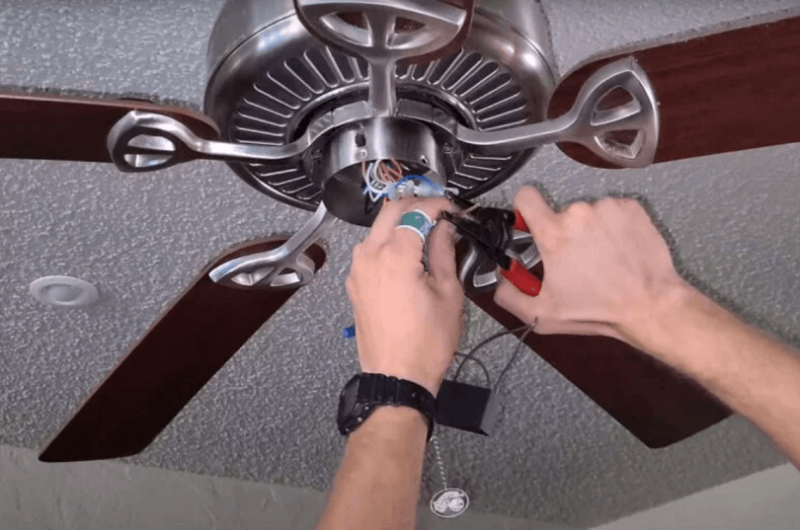
Replacing a 3-in-1 capacitor in a ceiling fan
Did you ever stop and ask yourself a question what is that thing installed in a fan that keeps it rotating? You might have never done it. But we will let you know about it as all ceiling fans come with a cube shaped black box known as capacitor. They have the capacity to gather energy that transfer it for the sake of fan rotations; that is the reason it is essential to pay attention to the capacitor’s features before putting into your fans. A top-quality capacitor can boost the performance of your unit if it is compatible, whereas a substandard one can betray you any time. Apart from that, it is an easy task to replace a capacitor in your Hampton Bay Ceiling Fan and you can do it on your own by going through a few basic technical steps.
This article will discuss in detail about the Hampton Bay Ceiling Fan Capacitor. We will explore the troubling signs telling you of some problems with the capacitor. And lastly, we will have a look at the instructions on Hampton Bay Ceiling Fan Capacitor replacement. So, do you want to learn about it? Get your tool kit ready to do the job.
Learning About the Ceiling Fan Capacitor
A capacitor of the fan is made as a tiny dark case installed in the fan’s housing. These capacitors work as the heart of the unit to make them work and generate strong magnetic fields that boost the moving of the blades. The Hampton Bay Ceiling Fan comes with a durable capacitor that turns on the fan motor with its saved power when a wall outlet switch is used. Now you have learned about a working capacitor for your model just think of it that way if a functional capacitor becomes faulty one, what it could do to your unit. That is the reason you should always install a compatible capacitor in your ceiling fan.
Selecting Replacement Capacitor:
Generally, there are two types of capacitors used in most ceiling fans including a 3-in-1 capacitor and a starting capacitor. Both of them are unique in features.
A 3-in-1 capacitor is a flexible one, as it can move the fan, set it at low speed level, and offer power factor correction. So, it would be an ideal choice for ceiling fans that have multiple speed settings or energy saving options.
A starting capacitor is a basic one, primarily focused on turning on the fan motor. This is not particularly made for ceiling fans and may not work well with ceiling fans with multiple speed levels or energy saving features.
Here is a table that shows us the main differences between 3-in-1 capacitors and starting capacitors:
| Feature | 3-in-1 capacitor | Starting capacitor |
| Functions | Begin, work at low speed level, power factor correction is there | Start |
| Suitability for ceiling fans | Ideal for ceiling fans featuring multiple speed levels and/or energy-saving options | Can work well with basic ceiling fans |
Difference between 3 in 1 Capacitor and Starting Capacitor
- When it comes to installing a capacitor in your ceiling fan, homeowners often neglect the most important step that is about the specifications of the fan’s motor. So, you have to choose it wisely.
- Choose the capacitor for your unit with the ideal capacity, voltage, and frequency. As we already mentioned above, a capacitor works as a powerhouse of the fan. And when the is a problem with the energy source, the entire fan will not work.
- If you need assistance about choosing the best voltage capacitor, just keep in mind that you can get the clarification by making a call. Whenever you are free just schedule an online call with the Hampton Bay team and get your questions answered with ease.
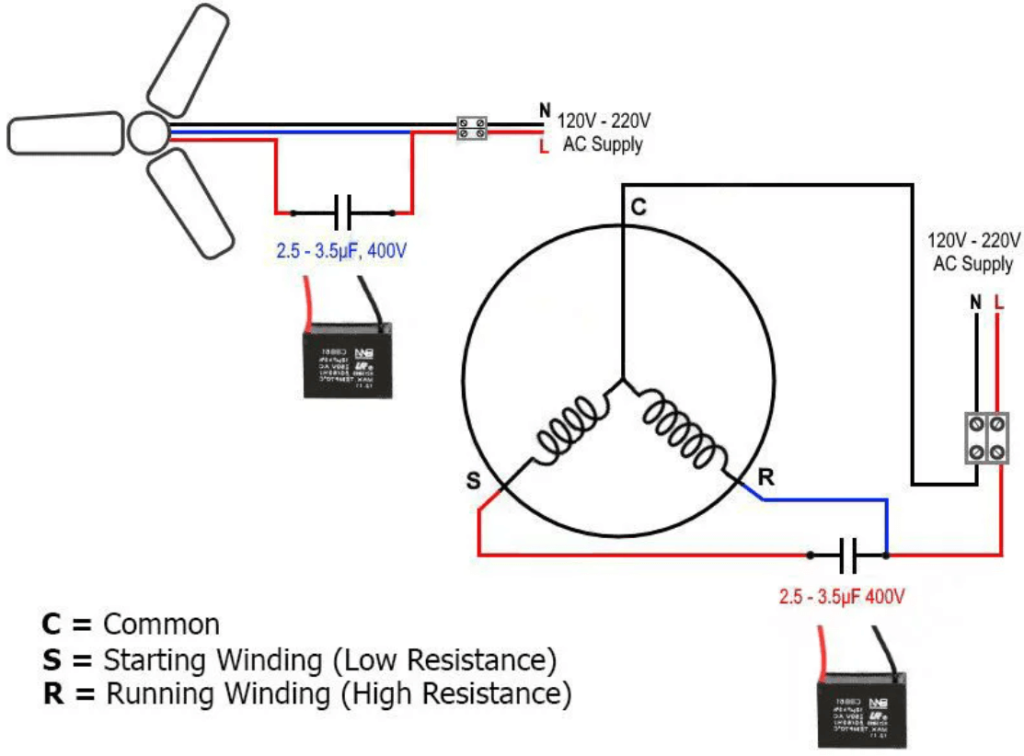
2-wire or Starting Capacitor Ceiling Fan Wiring Diagram

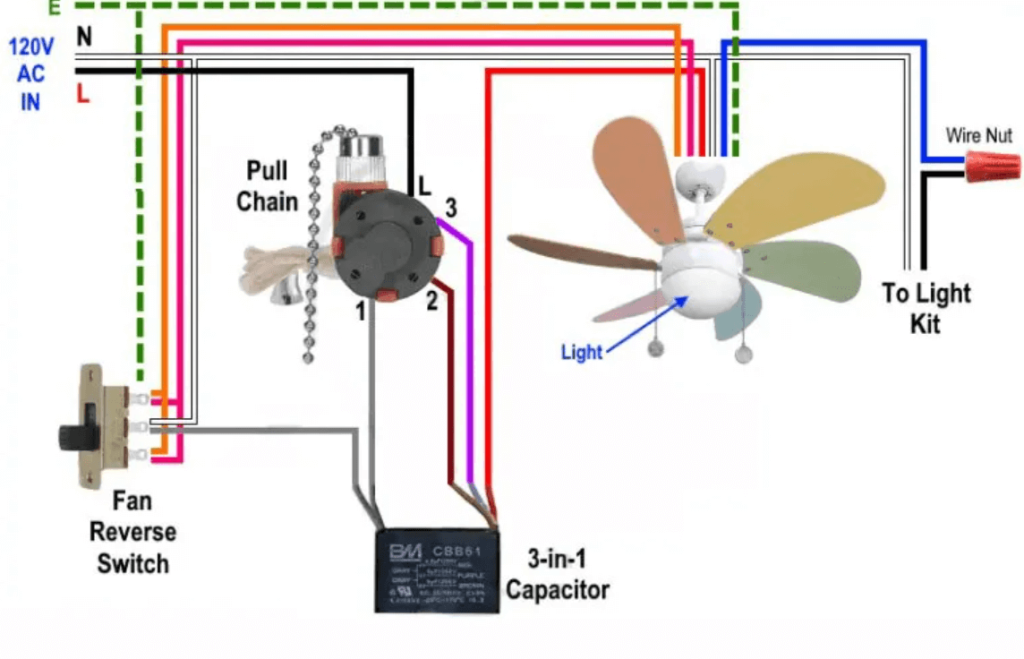
3-in-1 Capacitor With Ceiling Fan Reverse Switch Pull Chain Wiring Diagram

Benefits of Compatible Replacement Capacitor:
- Important for proper fan function: Capacitors are used in fans to boost the motors’ life. Motors serve fans as they are engine. All the parts work step by step, and when all the components are efficient, the fan work properly as well.
- The bad one can be bad for motor: A ceiling fan functions best due to the cooperation of motor, capacitor and blades. So, it is inevitable if the capacitor would not work properly, the motor functions would be faulty as well.
- Must match the voltage and capacitance: You have no idea what would be the result when you go for irrelevant capacitance and voltage capacitor in your fan. If you would install a capacitor with a lower capacitance than the required is similar to pulling a truck with a car.
- Select one made for ceiling fans: Visit the hardware shop and ask the manager to give you the best fit capacitor for your ceiling fan. before you replace your capacitor, the best course of action is to contact the Hampton Bay team first so that you can get a capacitor that helps ceiling fans to work at the best.
- Get the same microfarads and voltage as the original, and to make the selection process easier; you can also choose an HQRP capacitor to use in your Hampton Bay ceiling fan.
Signs of a Faulty Capacitor
There is a good thing about machinery that is, if it has a fault in it, it will let you know and will cause annoying sounds or show some malfunctioning signals to notify you till you fix it or replace it. The same is the case with defective fan capacitor. Apart from unusual sound, you will come across some issues with the moving speed of the fan. these alerts will mess with the fan operations and the capacitor needs instant replacement.
In this section, we will have a look at the glitchy signs which your capacitor is making to inform your something. So, explore these malfunction signs one by one. Let’s begin.
Common Indications of Faulty Ceiling Fan Capacitor:
- Unusual noises: There will be some mechanical sounds. Generally, the sound can be humming or any other weird one.
- Fan speed problems: The fan speed will become slow and unstable.
- The fan not moving or irregular starts
- Fan overheating: Now, this is a sign should be taken seriously, as an overheated fan can be harmful for the motor.
- Insufficient airflow: You will not have effective cooling and it causes poor ventilation. The reason is that the fan is rotating but not acting like a fan.
Other Possible Signs of Faulty Capacitor:
- Ceiling Fan won’t work: The ceiling fan won’t turn on even if you have turned on the power supply using the wall switch.
- More vibrations: The ceiling fan will shake or rattle to make unsteady movements.
- Burning smell: Sometimes, overheating of the fan can cause the motor to burn.
If you have any of the above mentioned problems, speed up and call your nearest expert to get it repaired or inspected before it gets out of your hands.
The HQRP Capacitor: A Suitable Replacement
Do you want to get a simple capacitor replacement that will save you from the headache of contacting Hampton Bay support repeatedly? Well, everyone wants to do it. Fortunately! We have got you covered. We have handpicked the HQRP Capacitor. The first reason why we selected this capacitor for your Hampton Bay ceiling fan is the easy installation.
The HQRP Capacitor is full of noteworthy features that make it compatible with most Hampton Bay ceiling fan models and most specifically with the CBB61 1.5uf+2.5uf one.
HQRP Capacitor for Hampton Bay ceiling fans
Now, let’s have a look at the few features of the HQRP capacitor to have more knowledge about the HQRP capacitor’s and whether it is worthy for your Hampton Bay Ceiling Fan.
- HQRP capacitors are designed with quality and durable material.
- They are also equipped with heat-resistive features.
- UL approval makes the HQRP capacitor safe in terms of installation.
- This is one of the best features you will know about
- HQRP. All the versions of HQRP are a great choice as a capacitor and they are available at economical rates. How good is that?
- HQRP can be easily installed in your fans, as it only requires two basic electrical connections to make it functional.
- HQRP capacitor enduring operation boost the life of both the fan and motor.
- By using HQRP, you will be having exceptional customer service and assured satisfaction.
If there is any question or confusion about the HQRP installation, then you can get help from the skilled HQRP team. You can go to the official HQRP team website whenever you want to get help.
Step by Step Guide to Replace a Ceiling Fan Capacitor
Here are the steps that you need to perform with proper safety considerations to replace a capacitor on your Hampton Bay Ceiling fan.
Safety first:
Our first concern is always to promote your safety above everything. That is the reason we always pay attention to safety considerations first and begin every troubleshooting tip with it.
Turn off electricity: If the power supply is turned on, avoid even touching the fan. First make sure that the electricity is turned from the power distribution panel before you begin with replacing the fan’s capacitor.
Wear glasses and gloves: It is necessary to wear personal protective equipment while dealing with an electrical appliance. So, always consider wearing safety glasses and insulating gloves when you are on DIY maintenance.
Avoid wires: When fixing any electrical appliance, you are at a huge risk of electrical hazards.
Tools you will need:
Let’s explore the essential tools to make your capacitor replacement easier and successful.
- Screwdriver is required to tighten and loosen the screws while removing and attaching the housing of the fan.
- Wire strippers can be used to strip off the wire protective layers while making the new electric connections.
- Electrical tape is used to cover the stripped electrical connections in an insulation coverage.
- New capacitor to change it with the defective one. You can choose the HQRP to get the best features at reasonable price.
Step-by-step guide for replacing a Hampton Bay Ceiling Fan Capacitor:
- First of all, you will unscrew the nut at the fan housing base to remove the fan housing.
- After removing it, you will be able to see the faulty capacitor secured in its place with two wires. It is generally a tiny black box found in the fan housing.
- Then, you will pull out the wires of the defective capacitor by using a wire stripper. Avoid touching the bare wires because they are very dangerous, and you are aware of it.
- Next, you will hold the stripped ends of the wire of fan and remove the margins by one-fourth of an inch. Ensure that you have put the electronic gloves on when you are doing this step.
- After dealing with the stripping, you will make a connection between the stripped fan wires with the new capacitor wires. Just make sure that you have done it correctly.
- Then, you will use the electronic tape in order to cover all the newly establish electrical connections for insulating coverage.
- Reinstall the fan housing by screwing the nuts in the fan base.
- Lastly, you will switch on the electricity to check the fan speed and functions.
Tips:
Get Assistance from Hampton Bay Team or an electrician
If you have any confusion about any aspect of replacing the capacitor or you think it is a complex issue, then do not worry. You can get help from Hampton Bay online chat whenever you want without spending anything. Additionally, you can also go through the Hampton Bay manual or consult a skilled repairman to keep uncertainties at arm’s length!
Don’t overtighten screws.
You might be thinking that overtightening the screws will keep them fixed. However, unluckily, it is causing more harm than good. The stability of fan operation can be compromised by overtightening the screws, causing a fan to wobble.
Install a wet-rated capacitor for a wet ceiling fan.
Now, this may have triggered the curiosity in you about knowing about a wet ceiling fan, right? A wet ceiling fan is made to withstand water and moisture, that is why, it is ideal for exterior setup. They are frequently used in moist environment; therefore, they will not work perfectly by using a normal capacitor.
Testing the New Capacitor
Is there any confusion about the successful replacement of your Hampton Bay ceiling fan capacitor? Well, you can test it to found out about it. In this section, we have covered the different aspects of the installed capacitor testing procedure to help you learn about it in a better way. Let’s begin now.
Checking Newly Installed Capacitor:
- You will flip the switch from the wall outlet to turn on the fan and start the testing process.
- Be cautious about the unusual mechanical sounds.
- Check the noise intensity by changing the speed levels of fan, changing the speed from low to medium and medium to high.
- Then, you will test the blades of the fan by moving them in different direction to examine if the movements are proper and stable.
- If everything seems perfect and fan is working smoothly without making any bizarre sound, well done! You have successfully done your job with your technical expertise.
Issues After Replacement:
Now, there is a question that remains in your mind regarding the problems after a capacitor replacement on your ceiling fan. So, let’s have a look at glitchy alerts telling you about the bad replacements.
- You will hear strange sounds from your ceiling fan at slow or different speed adjustments. In short, you will continuously receive those pesky noises once you turn on the fan.
- You will see erratic and unsteady movements on your Hampton Bay Ceiling fan.
If you are unsatisfied with the replacement of your capacitor, then do not despair. You can always get help from the professionals and technical experts. So, do not wait, simply schedule a call to begin the process.
Conclusion
Hampton Bay is the apple of the eyes of the users of the united states for its premium quality and fully featured ceiling fans. Home Depot has strengthened the corporate image of Hampton Bay by offering well-built capacitors to stay strong among the competitors. Hampton Bay is familiar with the importance of well-functioning capacitor to ensure the fan speed, that is why, it hardly happens that a Hampton Bay Ceiling Fan Capacitor to fail. However, if you are facing a problem with your Hampton Bay ceiling fan capacitor, the best course of action is to change it immediately. While choosing a new capacitor for replacement, focus on the capacitor quality, voltage and frequency as they should be matching to the ceiling fan to avoid the future capacitor betrayal. Additionally, you should abide by the troubleshooting steps properly while taking the safety considerations into account to do the capacitor replacement successfully.
That’s it, folks for the Hampton Bay Ceiling Fan Capacitor replacement. Have you ever changed a capacitor on your ceiling fan by yourself? Was it easy? Are you familiar with the act of replacing the capacitor? If yes, leave your experience in the comment section.
